Have a Question? Ask Our Pros!
Average Rating
There are no reviews for this product yet. Be the first.
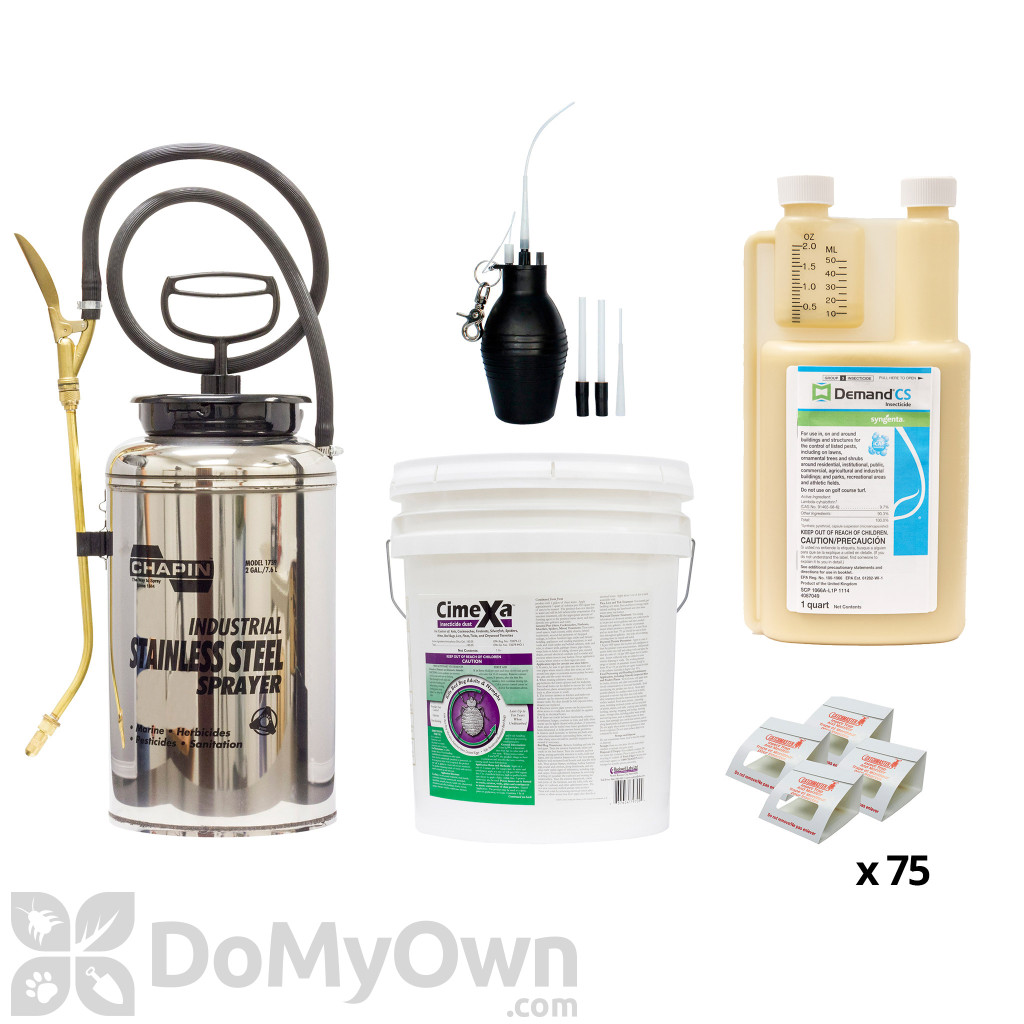
The General Pest Control Starter Kit - Commercial contains the chemicals and equipment needed to perform your own professional general insect control in apartments, hotels, and similar large areas. This kit contains larger sizes of insecticides for the lowest costs per application as well as tougher equipment made to handle more frequent use. We recommend using an Integrated Pest Management approach for the best results, incorporating thorough inspection, sanitation and exclusion practices along with the use of products in your kit.
This kit contains a Chapin Industrial Stainless Steel 2 Gallon sprayer needed to apply the Demand CS Insecticide Concentrate. It also has a B&G Bulb Duster 1150 to apply the CimeXa Insecticide Dust. Finally, this kit includes a case of Catchmaster 100i Glue Boards to help identify insects, target infestations, and monitor treatments.
If you have already purchased this kit, or if you already have a sprayer and duster to apply the insecticides, see our General Pest Control REFILL Kit - Commercial.
For residents of NY & VT, see our New York General Pest Control Starter Kit - Commercial.
See all our Pest Control Kits here.
Other size options are available.
To compare the sizes and savings of all of our General Pest Control Starter Kits, see our DIY Pest Control Service Kits Guide.
| NOT FOR SALE TO | NY, VT (Restricted To Licensed Applicators Only) |
|---|---|
| Shipping Weight | 24.96 lbs |
You should always thoroughly Inspect treatment areas to find insect pathways, entrance points, and harborage areas prior to treatment. Practice proper sanitation in areas that you can control, and work with tenants in rental areas to understand the importance of this practice before applying insecticides. Seal up possible entrance points to keep pests from entering structures. These steps will improve treatments of existing infestations as well as keep new infestations from starting.
STEP 1 - Spray - Chapin #1739 Stainless Steel 2 Gallon Sprayer and Demand CS Insecticide
*To use the Chapin model #1739 Sprayer, you will need to follow a few simple steps. Complete instructions are included in the sprayer box.
*Ensure the exterior hose is pushed all the way to the tank, that the hose clamp is tight. Use a flathead screwdriver to tighten the hose barb, if necessary.
*To assemble the extension wand, unscrew the adjustable nozzle from the shut-off handle, then attach the brass extension wand by screwing the straight end onto the brass handle.
*Replace the brass adjustable nozzle by screwing it onto the end of the brass extension wand.
*Turn handle counter-clockwise as far as it will go, then continue to turn the entire pump mechanism counter-clockwise to release the top. This sprayer has a Tri-Lock release for extra safety, so you will feel three separate steps when removing the pump handle. Now you are ready to use your sprayer.
*Wear gloves when mixing and handling pesticides, such as Nitrile Chemical Resistant Gloves.
*Fill the tank 1/3 - 1/2 with clean, temperate water. Shake Demand CS before measuring and mixing. The 32oz bottle of Demand CS is a Squeeze-and-Pour bottle, so you will hold the bottle with the label facing you, then squeeze the main chamber of the bottle on the right to fill the small reservoir with the desired amount of Demand CS on the left. Use 0.2-0.4 oz per gallon of water for maintenance and prevention, and use 0.8 oz per gallon of water for cleanouts or a longer residual. See the Product Label for complete dosage recommendations on specific pests and application sites.
*Gently agitate the tank to begin mixing the insecticide solution.
*Finish filling the sprayer tank with water to the desired gallon mark.
*To lock the pump, replace the assembly into the sprayer tank, placing the three prongs down into the corresponding slots, ensuring the three prongs of the top of the assembly are in the third and lowest “lock” position. Turn the sprayer handle clockwise until it is locked tightly.
*Re-agitate the tank to ensure complete mixing of the insecticide solution.
*To pressurize the tank, first release the handle by pushing down to depress the coil spring, and then turn the handle counter-clockwise ¼ turn. Lift the handle out, then pump until you feel resistance.
*Turn the end of the nozzle to adjust the spray pattern from a pin stream to a wide cone spray.
*When you are finished spraying, turn the pressure release valve on top of the sprayer to release pressure before opening or storing the sprayer.
*Apply Demand CS to the following areas:
*Keep pets and children out of the treatment area while spraying and until the application has dried, usually about an hour.
*Try to use up all the spray mixture in one application. If spray solution is stored overnight, re-agitate the tank before spraying. After use, spray some clean water through the tank outside as a rinse, then store the tank empty and open in a cool, dry area.
*Do not apply Demand CS to edible plants such as vegetable gardens or fruit trees.
*Repeat application at 90-day intervals for general maintenance. In times of higher pest pressure, such as summer months, or in areas with extended direct sunlight, applications may be made more frequently, such as every 30 days.
*Demand CS may be applied as a spot or crack and crevice treatment indoors in areas such as around door frames and window frames, where utilities enter, and behind and under appliances.
STEP 2 - Dust - B&G Bulb Duster 1150 and CimeXa Insecticide Dust
*After your spray application has dried, you can apply the insecticide dust.
*Using insecticide dust can be very messy, so be sure to wear gloves such as Nitrile Chemical Resistant Gloves, and consider having a moist paper towel handy to clean up excess dust.
*The CimeXa Dust 5 lb. pail includes a small scoop, but this scoop may not be on the surface of the contents.
*To fill the Bulb Duster 1150, gently unscrew the top to allow space for filling the duster.
*Use the included scoop to gently tap CimeXa Dust into the bulb duster, filling the bulb no more than halfway to allow space for the dust to move inside the duster.
*You may want to add a few small objects such as coins or pebbles to prevent dust from clumping.
*Replace the cap by gently following the threads until the top is fastened securely.
*Use the longest, curved extension tip for most applications. Additional segments may be added onto the top of the duster for more reach.
*To apply dust, simply direct the extension tip into the application area, then squeeze the bulb to release the insecticide.
*Apply insecticide dust to cracks and crevices such as:
*Dust can also be used indoors in cracks and crevices where the dust will not easily be removed or disturbed, such as behind outlet covers, under baseboards, around pipe collars, and under and behind cabinets.
*Re-apply insecticide dust every 6 months.
*See our Video for more tips on dusting.
STEP 3 - Monitor and Maintain - Catchmaster 100i Insect Monitors
*Use the included Catchmaster Insect Monitor Glue Boards to monitor pest activity and to track your progress:
*Repeat spray applications every 90 days, or more frequently in the summer, if needed.
*Repeat dust applications every 6 months for best results.
*Continue to monitor the environment and make adjustments as necessary to keep up your Integrated Pest Management practice.
*Use the General Pest Control REFILL Kit - Commercial to continue treatments.
There are no reviews for this product yet. Be the first.
There are no questions for this product yet. Ask the first.